Good Eats Newsletter - September 1, 2010
This Week's Vegetable Share Contains:
Orange & Yellow Carrots; Shallots; Sweet Mixed Peppers; Yellow Swiss Chard; Leeks; Yellow Storage Onions; Radishes; Edamame; Savoy Cabbage; plus...
Localvore Offerings Include:
Red Hen Grain & Seed Bread
Pa Pa Doodles Farm Eggs
Les Aliments Massawippi Tamari
Quebec Mixed Cracked Grains
Laughing Moon members will get their pizza dough this week.
MEAT SHARE MEMBERS - THIS IS A MEAT SHARE WEEK
Pete's Musings
Just your average August day at Pete's Greens. Here are some of the things that have already happened today. We harvested, washed, and packed 800 lbs of baby greens; picked and shucked 3 pallets of corn for freezing tomorrow; finished prepping and packed 300 gorgeous CSA shares; harvested piles of fennel that are at risk of going by in this heat; packed meat shares; containered tamari for tomorrows delivery, sent a bunch of veggies to stores and restaurants via Black River produce; worked on our new reefer truck; bushhogged several fields; tended the farmstand; fed and watered lots of chickens; weeded; answered dozens of emails; wrote a CSA newsletter; planned tomorrows fall crop planting, and it goes on. Thanks crew, we're getting it done. ~Pete
Sean's Adventures
This week Sean takes a short farm tour with Pete, gleaning tips and info on specific veggies out in the field. Check out Sean's blog.
Fall/Winter Good Eats Sign Up
The Fall share is a rich share period that inspires a great season of cooking. We are still harvesting much of the vegetables from the field at the start of the share. Remnants of summer such as tomatoes and peppers may appear, but by mid-November the offerings will be distinctly fall-like. Our root cellar will be overflowing with potatoes, onions, leeks, turnips, shallots, rutabagas, carrots, beets, cabbages, kohlrabi, celeriac, and winter squash. We expect to be harvesting baby greens such as head lettuce, and other hardy greens such as chard and kale into December. With each passing year, Pete gets better and better at growing salad greens and sprouts in the cold winter months and last year we succeeded in sending out fresh green salad fixings throughout the share. We intend to provide something fresh and green nearly every week this winter to compliment our wide variety of roots and storage crops. We will also be supplementing our stored crops and fresh greens with frozen item like tomatoes, corn, spinach, braising greens, winter squash, rhubarb, peppers and more. The combination of storage crops, hardy crops, greenhouse items and frozen and preserved veggies and fruits will keep us all eating a healthy, rich local diet all winter long.
Sign up for the Good Eats Fall/Winter Share now to ensure continued weekly deliveries! The Fall share begins on Oct 20th and continues through Feb 16th.
Please visit the Fall/Winter Share page for details and to download a sign up form.
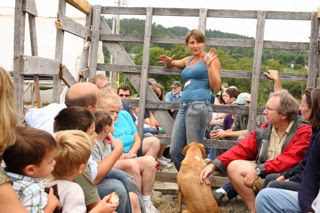
Pete's Open Farm Day
Our open farm day this year was attended by around 200 people who came throughout the day. People really seemed to enjoy the tours of the farm, given via tractor/wagon ride. Our open farm coincided with the first annual Kingdom Farm & Food Days which was well attended by people wanting to visit all the open farms in the area and learn more about the food production happening here. There were quite a few people who planned their weekend around the event, visiting farms on Saturday, and then taking part in the workshops at High Mowing and eating well at the Local Foods Showcase on Sunday. This event will continue to evolve in the next couple of years and will be a really great weekend to plan to make time for. The planning is already underway for next year.


Outstanding Blog Posts
Two great blog posts out this week about the Outstanding in the Field dinner held at the farm. Click below if you'd like to read more about the event.
Farm Plate blog
Piccante Dolce blog
Storage and Use Tips
Edamame - Soybean varieties grown for eating the beans from the pod are called edamame. Long common in the Japanese diet, in recent years edamame has been gaining popularity in the US and now I see kids in daycare with their little containers of beans for lunch. And no wonder because it's incredibly easy to prepare, the beans are delicious, and they pack a lot of nutrition into a very small package. A half cup of shelled edamame (from approx 1.25 cups of pods) contains 9 g fiber, 11 g protein, and a good amount of Vitas A and C. Edamame freezes really well too. Just blanch pods in boiling water for 2-3 mins, drain and cool in ice water, and freeze in a single layer, then bag. Edamame should not sit in the fridge for days before you get around to eating it. Like all beans they are better the fresher they are. If you won't eat them in the next few days, freeze them!
Yellow Swiss Chard - Chard comes in many varieties with stems gleaming in an array of gorgeous colors, this week yellow. I know that none of you need any introduction to Swiss chard but this morning I read an article about how most Americans don't get nearly enough potassium or magnesium. And then it went on to list top sources of both and chard was there at the top of the list for both nutrients. And of course it's at the top of the charts for vitamins K & A (you get more than 100% of your DV), C (you get more than 50%), and it's an excellent source of iron, Vita E, fiber, copper, calcium and the list goes on. How nice that it is also so versatile and delicious.
Localvore Lore
From Randy George at Red Hen Baking Co.
This week we are baking a bread that could be called "Four Grains and a Seed" that features some fun things grown in the area. There is wheat flour from both Aurora Farms and Gleason Grains, cornmeal from heirloom corn (Wahpsie Valley variety), flax from Canada, oats from Canada, and cracked rye. Many of you have probably had our Mad River Grain bread. This is a version that sticks a little closer to home in terms of the ingredient sourcing and is also a fair bit darker because we have used a higher proportion of Ben Gleason's whole wheat. Enjoy! ~ Randy
Two items in the share today from Isaac's Quebec trip. In North Hatley, Suzanne and Gilbert, owners of Les Aliments Massawippi, make very fine miso and miso-damari (aka tamari). Tamari literally means liquid pressed from soybeans, and for centuries it meant the thick brown liquid that pooled in casks of fermenting soybean miso. This tamari was a rare delicacy reserved for special occasions. The tamari in the share today was made by this slow natural process. It is an unpredictable process in terms of flavor and yield. Each time I call Gilbert to place a tamari order, what I give him is really just a wish list. It's not until after he presses the miso that we find out how much tamari will be available.
Eventually producers learned to brew tamari-like liquid soy sauce that had similar characteristics as the original by-product of miso. Most high end tamari is brewed from whole soybeans, sea salt, water, and koji (Aspergillus hacho) rather than pressed from naturally fermented miso. The newer method is a fast way to turn out a fairly consistent product that is similar to but not nearly the quality of the real thing. Commercial soy sauces (even some labeled as shoyu or tamari) are another step down and are usually made from soybeans that have been defatted with hexane, a petroleum derivative. Other common shortcuts are artificial fermentation methods including genetically engineered enzymes. Most soy sauce is actually caramel colored water with lots of salt, hydrochloric acid treated soy isolate, and sugar added.
This tamari is pretty special and rare. It is a live food and has never been pasteurized. This is a Soy Oats Barley Tamari. Please transfer to a small glass jar and for best quality and store in your fridge. It will last a very long time.
From Michel Gaudreau in Quebec we have his Mixed Cracked Grain cereal mix. This is a blend of 6 grains, including organic wheat, rye, oats, barley, spelt, and flax seed. The grains have been cracked for quicker cooking. This grains mix can be cooked and used as you would use bulghur wheat or barley, it can be cooked as a breakfast cereal, or added to breads and muffins for some whole grain goodness.
Pa Pa Doodles eggs again this week. Enjoy them, it will be two more weeks (Sep. 22) before you see them again. We are on a two week on, two week off schedule.
Meat Share
Tangletown Whole Peking Duck - I have been wanting to supply duck for a while. But it's hard to get and it can be expensive. Why is it pricey? Because it turns out ducks are notoriously hard and time consuming to pluck! So I was excited to get an email from Lila at Tangletown Farm telling me that she was going to have more ducks than she would have room for in her freezer. Tangletown Farm is a small family farm in Middlesex, Vermont. Lila Bennett & David Robb and their three children raise a diverse selection of organic and ethically raised animals for meat. They farm as a family with a vibrant commitment to healthy animals, healthy people, and sustainable agriculture. They purchase certified organic grain when available from growers in Addison county and believe strongly that Vermonters can thrive on VT grown food. All of the Chickens, Ducks, Guinea Hens, Turkeys, Rabbits, Lambs, Pigs and Cows are raised on lush pasture. You can meet Lila and Dave any week at the Montpelier and Waterbury Farmers' Markets.
Pete's Pastured Country Style Pork Ribs - Our pork has just returned from the butcher and we are in the meat business again, while it lasts! Our pigs are pasture raised on our farm, with acres and acres to call their own. They graze on the plants and grasses in the field, wallow in their mud hole when it's hot, and make use of lots of leftover vegetables on the farm. They live a supremely happy life, just being pigs. Because of the vegetation they take in, their meat is vitamin packed. Country style ribs are great, marinated and slow cooked, finishing them off on the grill or under the broiler. You can also cut them up and use them to make chili, stews, or a rustic pasta sauce. If you cook them slowly (1.5 to 2 hrs) in the oven and then finish them on the grill or at a higher oven temp, you will be rewarded with meat falling from the bone, tender, browned on the outside, tender on the inside ribs, no matter what flavor you make them. A simple BBQ recipe follows below.
Pete's Pastured Ground Beef - A second offering of our own this round as we have recently put some of our beef in the freezer. We raise our beef in partnership with friend and neighbor Bruce Urie. Our beef are raised on pasture, and fed Bruce's own hay in winter supplemented with some beet pulp and soy. Like their pig friends and neighbors, they spend their days on pasture, un-medicated, hormone free, stress free.
Recipes
Leek and Swiss Chard Tart
This recipe comes together quickly after sautéeing the leeks and the chard for a few minutes. Although the recipe here calls for puff pastry, you can line your pie plate with a regular pie crust or change it up by adding several layers of filo dough instead. Your choice. You could reduce the fat by switching from full cream to part cream, part milk. You could even go to straight milk though you will lose some of the rich flavor of the dish. The recipe comes from Bon Appétit October 1999 and makes 8 servings.
1 sheet frozen puff pastry (half of 17.3-ounce package), thawed
2 tablespoons butter
3 large leeks (white and pale green parts only), coarsely chopped
1 teaspoon dried thyme
1/2 bunch Swiss chard, ribs removed, leaves chopped (about 2 1/2 cups)
1 1/4 cups whipping cream
3 large eggs
2 large egg yolks
1 teaspoon salt
1/4 teaspoon ground black pepper
Pinch of ground nutmeg
Roll out pastry on floured work surface to 12-inch square. Transfer to 9-inch-diameter glass pie dish. Trim overhang to 1 inch. Fold under; crimp edges. Cover; chill.
Melt butter in large nonstick skillet over medium-low heat. Add leeks and thyme. Sprinkle with salt and pepper. Cover; cook until leeks are very tender but not brown, stirring often, about 10 minutes. Add chard; saut until wilted, about 2 minutes. Remove from heat; cool.
Position rack in bottom third of oven; preheat to 425°F. Whisk cream and next 5 ingredients in large bowl. Mix in cooled leek mixture. Pour filling into crust.
Bake tart 15 minutes. Reduce heat to 350°F and bake until filling is puffed and just set in center, about 15 minutes longer. (Tart will take longer to cook if using more milk, less cream.) Transfer to rack; cool 10 minutes.
Roasted Carrots And Leeks Recipe
serves 8
8 large carrots
4 large leeks
Extra-virgin olive oil
1 tablespoon crumbled dried tarragon
Salt and freshly ground black pepper, to taste
Preheat oven to 375 degrees F.
Wash and peel carrots and cut into 1-inch chunks, or, if using smaller carrots, cut slightly longer pieces. Trim leeks, reserving tough parts for making stock if you wish. Split leeks in the middle lengthwise and wash thoroughly to remove any sand and dirt. Cut into lengths about the same size as the carrots.
Pour olive oil to cover the bottom of a heavy-bottomed, oven-proof skillet. Heat and add carrots; toss and pan-roast until vegetables begin to brown a little. Add tarragon and salt and pepper. Transfer to a baking sheet and place in oven.
Add a little additional olive oil to the pan and saute leeks until they wilt and begin to caramelize. After carrots have baked for about 1 hour (less time if using small carrots), add leeks, toss with carrots and continue baking for about 15 minutes more, or until vegetables can easily be pierced with a fork, about 15 minutes.
Curry Carrot-Leek Soup
1 pound thinly sliced leeks, white parts only
1 pound carrots, coarsely chopped
2 teaspoons butter or stick margarine
1 medium potato, peeled and diced
1/2 teaspoon curry powder
4 cups reduced-sodium chicken broth
1/4 teaspoon salt
1/4 teaspoon pepper
In a large saucepan, saute leeks and carrots in butter until leeks are tender. Add potato and curry powder; cook and stir for 2 minutes. Add broth, salt and pepper; bring to a boil. Reduce heat; cover and simmer for 15-20 minutes or until the vegetables are very tender. Cool slightly. Process in batches in a food processor or blender until pureed. Return to the pan; heat through.
Tahini Tamari Lemon Dressing
This is yummy dressing. You can swap the olive oil for sunflower oil. You can skip the nutritional yeast though it does add depth to the flavor. The dressing is great on green salads (it's similar to Amy's Goddess dressing) and also great as a fresh veggie dip and with falafel.
2/3 cup olive oil
1/3 cup fresh lemon juice
1/3 cup tahini
1 tablespoon nutritional yeast
1/4 cup tamari
1 tablespoon honey
1/2 teaspoon dried oregano
1 tablespoon mayonnaise
salt and pepper to taste
In a blender, combine olive oil, lemon juice, tahini, nutritional yeast, tamari, honey, oregano, mayonnaise and salt and pepper. Process until smooth and serve over salad.
Edamame
whole fresh edamame pods
salt (preferably sea salt or kosher salt)
Bring a large pot of water to a boil. Add edamame and continue boiling until beans are crisp-tender, about 10 minutes. To prevent overcooking, start checking for doneness approximately 7 minutes after cooking. (To check, remove one carefully, dip in cold water to cool, and taste.)
When done, run cold water over, or put in ice water, to stop cooking. Drain well; pat excess moisture off, and sprinkle with salt to taste. (Start with 1/2 teaspoon.)
To eat, hold pod by stem end, and slide the individual beans out with your teeth. Discard pod.
Mixed Cracked Grains
The recipe below gives the very basic method of cooking mixed cracked grains. There are many, many ways to play with cooked grains though. For a special breakfast cereal, cook them with part water and part milk and add dried fruit, nuts, cinnamon and maple syrup or sugar (as you would for oatmeal). Or cook them with broth as you would a risotto. Cook them plain and use them in a salad, dressed with a special dressing to flavor the whole dish. Or bake the cooked grains with vegetables and or meats and some seasoning in the oven for a hearty meal. The cooked grains can be kept in the fridge for a week, so cook up a pot and see what uses you might find for them during the week. Many mixed grains recipes have rice as part of the blend. You can try adding 1 part uncooked brown rice to 3 or 4 parts mixed cracked grains and cooking them together.
Basic Recipe
1 cup Mixed Cracked Grains
3 cups water
1/2 tsp salt
Boil water, add grains and salt. Cover and simmer until tender, about 35 minutes. Drain if necessary.
Ground Beef and Savoy Cabbage Lo Mein
12oz ground beef
1 onion
2 cloves garlic
1 tsp minced ginger
1/2 head savoy cabbage
1 medium carrot
1 sweet pepper
4 oz spaghetti - about 1 1/4" (3cm) diameter
2 tsp olive oil
1 cup beef stock
1 tbs tamari
2 tbs sherry
1 tbs cornstarch
Cook pasta according to package instructions.
While pasta cooks: Thinly slice onion. Mince garlic. Mince ginger (peel first). Cut carrot into matchsticks. Slice pepper into thin strips. Remove dark green outer leaves from cabbage. Cut off a thick slice, avoiding the core. Lay flat, cut into 3 or 4 wedges, then thinly slice the wedges
Heat olive oil in large nonstick skillet over medium-high heat. Add onion and carrot to skillet; stir-fry for 2 minutes. Add garlic, ginger, peppers, cabbage and stir-fry another 3 minutes. Remove vegetables from skillet and set aside. Add beef, and fry, breaking it up as it browns. Return vegetables to pan. Add beef stock and bring to a boil. Cover, reduce heat and simmer for 5 minutes. In a small bowl, whisk together sherry, tamari and cornstarch. Uncover skillet and stir in cornstarch mixture until thickened.
When pasta is done, drain and add to skillet. Toss to combine, tongs work best, or two forks. Serve. (If spaghetti doesn't fit into pan, put it into a large bowl and pour beef and vegetables on top.) Add more tamari if desired, according to taste.
BBQ Country Style Ribs
This recipe was reviewed by over 200 users of allrecipes.com, most giving it 5 stars. Not surprising as the method is perfect for this cut of meat and the lemon slices on top help tenderize the meat while it cooks. You could use any BBQ sauce for this, or just serve the ribs plain if you have picky kids in the house. They'll be yummy regardless. Some reviewers covered the ribs with foil for the first 2 hours to keep the more moist.
10 country style pork ribs
2 teaspoons minced garlic
1 lemon, thinly sliced
1 (18 ounce) bottle barbeque sauce
Preheat oven to 250 degrees F (120 degrees C).
In a shallow baking pan or roaster, place ribs in a single layer; salt if desired. Spread the garlic on the ribs, then place the lemon slices on top. Bake in a preheated oven for 2 hours - the ribs should be tender. Drain any grease and liquid. Pour BBQ sauce over the ribs. Return to oven and bake one more hour at 200 to 250 degrees F.
Oven Roasted, Delicious and Tender Tangletown Duck:
This is Lila and Dave's method for roasting their ducks in the oven. Though duck meat is quite lean, there is a layer of fat under the skin of ducks so drippings will be copious. Be watchful in case the fat should catch fire (less of a concern in the oven than on the grill).
1 Whole Duck
For stuffing (none of this is set in stone - use what you have)
3/4 cup celery - chopped
1.5 cups onions, chopped
1/2 apple, chopped
2-3 cloves garlic, minced
fresh herbs (thyme,oregano and sage are favorites)
Seeded Baguette, pre toasted and cut into small cubes
Preheat Oven to 350.
Mince at least 2 cloves garlic and rub over entire duck.
Place ON A RACK in a roasting pan. (this is important so as to let the fat from
the skin drip out).
Remove heart, neck and liver from cavity. Add stuffing to the cavity.
Gently make a few smalles holes in the breast and back of your duck. This is to
allow the fat to be released more evenly.
Put the duck in the oven, breast sided down. reduce the temperature to 275.
Cook slowly for 2 and a half hours or so.
Pull the duck out and flip over. Increase the heat to 300 and cook for another
30-45 minutes until the duck is fully browned. it will be more time for a duck
over five pounds, less for a duck under four pounds.
Drain the fat out of the pan. Save for later use in other recipes. Or, add garlic and herbs and make the fat into a rich gravy. Be careful not to over-cook your duck. Duck meat by nature is very lean, even though the skin has quite a bit of fat. The meat is flavorful and tender when cooked carefully and thoroughly.
Grilled Duck
So, there are two ways to grill duck: with a small grill fire or a large one. Meaning not what temperature you heat your grill to when you begin, meaning that you can either cause a small grill fire or a large one while cooking. Cooking a duck on the grill equals fire. No matter how you choose to grill your duck, keep you eyes on the duck at all times. All methods below have been tested thoroughly by Lila and Dave.
For a smaller fire:
Cut your duck in half. Cooking halves is much easier, and only takes a minute to cut the duck in half with a very sharp knife. Rub your favorite seasonings on the duck. We usually use salt and pepper only, as the duck flavor stands alone. We have marinated in barbecue sauce, or garlic herbs and a dash of olive oil as well. For a small grill fire, gently poke some holes into the breast and back of your duck (about 1" apart and piercing through both skin and fat until the knife tip meets the resistance of the duck meat below). Pan sear for a few minutes to just cook out some of the fat. Keep the duck moving a bit in the pan so as not to begin to cook the meat very much. Because duck meat is very lean it is important to cook the meat slowly to keep it from toughening.
Turn your grill on Medium.
Wrap your duck halves in foil, and place on the grill with the open carcass side down. Cook for 7-10 minutes, with the cover on the grill. Wait until you hear dripping and sizzling a bit going on. Then flip the duck and cook for about five minutes.
Now, remove the foil, and let the duck brown.
If the fire is getting big, take the duck off, let the fire burn out, and start again.
Duck is done when the skin is thin and crispy, and the duck is brown all over. If skin is not thin and crispy, the fat underneath has not been cooked off.
You can use the method above to grill a whole duck. Just wrap in foil and grill for 40 minutes or so. Then cook uncovered to brown.
If you want to grill the duck without foil, cut the duck into smaller pieces, and grill like small pieces of chicken. If you remove the skin from the duck breast, cook carefully so as not to overcook and toughen the meat. It is REALLY good this way. Like the steak of poultry.
For a large fire, cut the duck in halves or parts and put it on the grill. Turn the pieces continuously for about 12-15 minutes, avoiding the large flames ensuing from your grill. Cook until the fire is just subsiding. We have cooked half a duck at a time to keep the fat at bay. Usually after the fire completely chars the outside of the duck it is done and tender, and you eat it immediately. If you wait to eat for more than 30 minutes, the meat will cool and toughen.
Orange & Yellow Carrots; Shallots; Sweet Mixed Peppers; Yellow Swiss Chard; Leeks; Yellow Storage Onions; Radishes; Edamame; Savoy Cabbage; plus...
1 Bag Mesclun
1 Head Lettuce
1 Head Lettuce
Localvore Offerings Include:
Red Hen Grain & Seed Bread
Pa Pa Doodles Farm Eggs
Les Aliments Massawippi Tamari
Quebec Mixed Cracked Grains
Laughing Moon members will get their pizza dough this week.
MEAT SHARE MEMBERS - THIS IS A MEAT SHARE WEEK
Pete's Musings
Just your average August day at Pete's Greens. Here are some of the things that have already happened today. We harvested, washed, and packed 800 lbs of baby greens; picked and shucked 3 pallets of corn for freezing tomorrow; finished prepping and packed 300 gorgeous CSA shares; harvested piles of fennel that are at risk of going by in this heat; packed meat shares; containered tamari for tomorrows delivery, sent a bunch of veggies to stores and restaurants via Black River produce; worked on our new reefer truck; bushhogged several fields; tended the farmstand; fed and watered lots of chickens; weeded; answered dozens of emails; wrote a CSA newsletter; planned tomorrows fall crop planting, and it goes on. Thanks crew, we're getting it done. ~Pete
Sean's Adventures
This week Sean takes a short farm tour with Pete, gleaning tips and info on specific veggies out in the field. Check out Sean's blog.
Fall/Winter Good Eats Sign Up
The Fall share is a rich share period that inspires a great season of cooking. We are still harvesting much of the vegetables from the field at the start of the share. Remnants of summer such as tomatoes and peppers may appear, but by mid-November the offerings will be distinctly fall-like. Our root cellar will be overflowing with potatoes, onions, leeks, turnips, shallots, rutabagas, carrots, beets, cabbages, kohlrabi, celeriac, and winter squash. We expect to be harvesting baby greens such as head lettuce, and other hardy greens such as chard and kale into December. With each passing year, Pete gets better and better at growing salad greens and sprouts in the cold winter months and last year we succeeded in sending out fresh green salad fixings throughout the share. We intend to provide something fresh and green nearly every week this winter to compliment our wide variety of roots and storage crops. We will also be supplementing our stored crops and fresh greens with frozen item like tomatoes, corn, spinach, braising greens, winter squash, rhubarb, peppers and more. The combination of storage crops, hardy crops, greenhouse items and frozen and preserved veggies and fruits will keep us all eating a healthy, rich local diet all winter long.
Sign up for the Good Eats Fall/Winter Share now to ensure continued weekly deliveries! The Fall share begins on Oct 20th and continues through Feb 16th.
Please visit the Fall/Winter Share page for details and to download a sign up form.
Pete's Open Farm Day
Our open farm day this year was attended by around 200 people who came throughout the day. People really seemed to enjoy the tours of the farm, given via tractor/wagon ride. Our open farm coincided with the first annual Kingdom Farm & Food Days which was well attended by people wanting to visit all the open farms in the area and learn more about the food production happening here. There were quite a few people who planned their weekend around the event, visiting farms on Saturday, and then taking part in the workshops at High Mowing and eating well at the Local Foods Showcase on Sunday. This event will continue to evolve in the next couple of years and will be a really great weekend to plan to make time for. The planning is already underway for next year.


Outstanding Blog Posts
Two great blog posts out this week about the Outstanding in the Field dinner held at the farm. Click below if you'd like to read more about the event.
Farm Plate blog
Piccante Dolce blog
Storage and Use Tips
Edamame - Soybean varieties grown for eating the beans from the pod are called edamame. Long common in the Japanese diet, in recent years edamame has been gaining popularity in the US and now I see kids in daycare with their little containers of beans for lunch. And no wonder because it's incredibly easy to prepare, the beans are delicious, and they pack a lot of nutrition into a very small package. A half cup of shelled edamame (from approx 1.25 cups of pods) contains 9 g fiber, 11 g protein, and a good amount of Vitas A and C. Edamame freezes really well too. Just blanch pods in boiling water for 2-3 mins, drain and cool in ice water, and freeze in a single layer, then bag. Edamame should not sit in the fridge for days before you get around to eating it. Like all beans they are better the fresher they are. If you won't eat them in the next few days, freeze them!
Yellow Swiss Chard - Chard comes in many varieties with stems gleaming in an array of gorgeous colors, this week yellow. I know that none of you need any introduction to Swiss chard but this morning I read an article about how most Americans don't get nearly enough potassium or magnesium. And then it went on to list top sources of both and chard was there at the top of the list for both nutrients. And of course it's at the top of the charts for vitamins K & A (you get more than 100% of your DV), C (you get more than 50%), and it's an excellent source of iron, Vita E, fiber, copper, calcium and the list goes on. How nice that it is also so versatile and delicious.
Localvore Lore
From Randy George at Red Hen Baking Co.
This week we are baking a bread that could be called "Four Grains and a Seed" that features some fun things grown in the area. There is wheat flour from both Aurora Farms and Gleason Grains, cornmeal from heirloom corn (Wahpsie Valley variety), flax from Canada, oats from Canada, and cracked rye. Many of you have probably had our Mad River Grain bread. This is a version that sticks a little closer to home in terms of the ingredient sourcing and is also a fair bit darker because we have used a higher proportion of Ben Gleason's whole wheat. Enjoy! ~ Randy
Two items in the share today from Isaac's Quebec trip. In North Hatley, Suzanne and Gilbert, owners of Les Aliments Massawippi, make very fine miso and miso-damari (aka tamari). Tamari literally means liquid pressed from soybeans, and for centuries it meant the thick brown liquid that pooled in casks of fermenting soybean miso. This tamari was a rare delicacy reserved for special occasions. The tamari in the share today was made by this slow natural process. It is an unpredictable process in terms of flavor and yield. Each time I call Gilbert to place a tamari order, what I give him is really just a wish list. It's not until after he presses the miso that we find out how much tamari will be available.
Eventually producers learned to brew tamari-like liquid soy sauce that had similar characteristics as the original by-product of miso. Most high end tamari is brewed from whole soybeans, sea salt, water, and koji (Aspergillus hacho) rather than pressed from naturally fermented miso. The newer method is a fast way to turn out a fairly consistent product that is similar to but not nearly the quality of the real thing. Commercial soy sauces (even some labeled as shoyu or tamari) are another step down and are usually made from soybeans that have been defatted with hexane, a petroleum derivative. Other common shortcuts are artificial fermentation methods including genetically engineered enzymes. Most soy sauce is actually caramel colored water with lots of salt, hydrochloric acid treated soy isolate, and sugar added.
This tamari is pretty special and rare. It is a live food and has never been pasteurized. This is a Soy Oats Barley Tamari. Please transfer to a small glass jar and for best quality and store in your fridge. It will last a very long time.
From Michel Gaudreau in Quebec we have his Mixed Cracked Grain cereal mix. This is a blend of 6 grains, including organic wheat, rye, oats, barley, spelt, and flax seed. The grains have been cracked for quicker cooking. This grains mix can be cooked and used as you would use bulghur wheat or barley, it can be cooked as a breakfast cereal, or added to breads and muffins for some whole grain goodness.
Pa Pa Doodles eggs again this week. Enjoy them, it will be two more weeks (Sep. 22) before you see them again. We are on a two week on, two week off schedule.
Meat Share
Tangletown Whole Peking Duck - I have been wanting to supply duck for a while. But it's hard to get and it can be expensive. Why is it pricey? Because it turns out ducks are notoriously hard and time consuming to pluck! So I was excited to get an email from Lila at Tangletown Farm telling me that she was going to have more ducks than she would have room for in her freezer. Tangletown Farm is a small family farm in Middlesex, Vermont. Lila Bennett & David Robb and their three children raise a diverse selection of organic and ethically raised animals for meat. They farm as a family with a vibrant commitment to healthy animals, healthy people, and sustainable agriculture. They purchase certified organic grain when available from growers in Addison county and believe strongly that Vermonters can thrive on VT grown food. All of the Chickens, Ducks, Guinea Hens, Turkeys, Rabbits, Lambs, Pigs and Cows are raised on lush pasture. You can meet Lila and Dave any week at the Montpelier and Waterbury Farmers' Markets.
Pete's Pastured Country Style Pork Ribs - Our pork has just returned from the butcher and we are in the meat business again, while it lasts! Our pigs are pasture raised on our farm, with acres and acres to call their own. They graze on the plants and grasses in the field, wallow in their mud hole when it's hot, and make use of lots of leftover vegetables on the farm. They live a supremely happy life, just being pigs. Because of the vegetation they take in, their meat is vitamin packed. Country style ribs are great, marinated and slow cooked, finishing them off on the grill or under the broiler. You can also cut them up and use them to make chili, stews, or a rustic pasta sauce. If you cook them slowly (1.5 to 2 hrs) in the oven and then finish them on the grill or at a higher oven temp, you will be rewarded with meat falling from the bone, tender, browned on the outside, tender on the inside ribs, no matter what flavor you make them. A simple BBQ recipe follows below.
Pete's Pastured Ground Beef - A second offering of our own this round as we have recently put some of our beef in the freezer. We raise our beef in partnership with friend and neighbor Bruce Urie. Our beef are raised on pasture, and fed Bruce's own hay in winter supplemented with some beet pulp and soy. Like their pig friends and neighbors, they spend their days on pasture, un-medicated, hormone free, stress free.
Recipes
Leek and Swiss Chard Tart
This recipe comes together quickly after sautéeing the leeks and the chard for a few minutes. Although the recipe here calls for puff pastry, you can line your pie plate with a regular pie crust or change it up by adding several layers of filo dough instead. Your choice. You could reduce the fat by switching from full cream to part cream, part milk. You could even go to straight milk though you will lose some of the rich flavor of the dish. The recipe comes from Bon Appétit October 1999 and makes 8 servings.
1 sheet frozen puff pastry (half of 17.3-ounce package), thawed
2 tablespoons butter
3 large leeks (white and pale green parts only), coarsely chopped
1 teaspoon dried thyme
1/2 bunch Swiss chard, ribs removed, leaves chopped (about 2 1/2 cups)
1 1/4 cups whipping cream
3 large eggs
2 large egg yolks
1 teaspoon salt
1/4 teaspoon ground black pepper
Pinch of ground nutmeg
Roll out pastry on floured work surface to 12-inch square. Transfer to 9-inch-diameter glass pie dish. Trim overhang to 1 inch. Fold under; crimp edges. Cover; chill.
Melt butter in large nonstick skillet over medium-low heat. Add leeks and thyme. Sprinkle with salt and pepper. Cover; cook until leeks are very tender but not brown, stirring often, about 10 minutes. Add chard; saut until wilted, about 2 minutes. Remove from heat; cool.
Position rack in bottom third of oven; preheat to 425°F. Whisk cream and next 5 ingredients in large bowl. Mix in cooled leek mixture. Pour filling into crust.
Bake tart 15 minutes. Reduce heat to 350°F and bake until filling is puffed and just set in center, about 15 minutes longer. (Tart will take longer to cook if using more milk, less cream.) Transfer to rack; cool 10 minutes.
Roasted Carrots And Leeks Recipe
serves 8
8 large carrots
4 large leeks
Extra-virgin olive oil
1 tablespoon crumbled dried tarragon
Salt and freshly ground black pepper, to taste
Preheat oven to 375 degrees F.
Wash and peel carrots and cut into 1-inch chunks, or, if using smaller carrots, cut slightly longer pieces. Trim leeks, reserving tough parts for making stock if you wish. Split leeks in the middle lengthwise and wash thoroughly to remove any sand and dirt. Cut into lengths about the same size as the carrots.
Pour olive oil to cover the bottom of a heavy-bottomed, oven-proof skillet. Heat and add carrots; toss and pan-roast until vegetables begin to brown a little. Add tarragon and salt and pepper. Transfer to a baking sheet and place in oven.
Add a little additional olive oil to the pan and saute leeks until they wilt and begin to caramelize. After carrots have baked for about 1 hour (less time if using small carrots), add leeks, toss with carrots and continue baking for about 15 minutes more, or until vegetables can easily be pierced with a fork, about 15 minutes.
Curry Carrot-Leek Soup
1 pound thinly sliced leeks, white parts only
1 pound carrots, coarsely chopped
2 teaspoons butter or stick margarine
1 medium potato, peeled and diced
1/2 teaspoon curry powder
4 cups reduced-sodium chicken broth
1/4 teaspoon salt
1/4 teaspoon pepper
In a large saucepan, saute leeks and carrots in butter until leeks are tender. Add potato and curry powder; cook and stir for 2 minutes. Add broth, salt and pepper; bring to a boil. Reduce heat; cover and simmer for 15-20 minutes or until the vegetables are very tender. Cool slightly. Process in batches in a food processor or blender until pureed. Return to the pan; heat through.
Tahini Tamari Lemon Dressing
This is yummy dressing. You can swap the olive oil for sunflower oil. You can skip the nutritional yeast though it does add depth to the flavor. The dressing is great on green salads (it's similar to Amy's Goddess dressing) and also great as a fresh veggie dip and with falafel.
2/3 cup olive oil
1/3 cup fresh lemon juice
1/3 cup tahini
1 tablespoon nutritional yeast
1/4 cup tamari
1 tablespoon honey
1/2 teaspoon dried oregano
1 tablespoon mayonnaise
salt and pepper to taste
In a blender, combine olive oil, lemon juice, tahini, nutritional yeast, tamari, honey, oregano, mayonnaise and salt and pepper. Process until smooth and serve over salad.
Edamame
whole fresh edamame pods
salt (preferably sea salt or kosher salt)
Bring a large pot of water to a boil. Add edamame and continue boiling until beans are crisp-tender, about 10 minutes. To prevent overcooking, start checking for doneness approximately 7 minutes after cooking. (To check, remove one carefully, dip in cold water to cool, and taste.)
When done, run cold water over, or put in ice water, to stop cooking. Drain well; pat excess moisture off, and sprinkle with salt to taste. (Start with 1/2 teaspoon.)
To eat, hold pod by stem end, and slide the individual beans out with your teeth. Discard pod.
Mixed Cracked Grains
The recipe below gives the very basic method of cooking mixed cracked grains. There are many, many ways to play with cooked grains though. For a special breakfast cereal, cook them with part water and part milk and add dried fruit, nuts, cinnamon and maple syrup or sugar (as you would for oatmeal). Or cook them with broth as you would a risotto. Cook them plain and use them in a salad, dressed with a special dressing to flavor the whole dish. Or bake the cooked grains with vegetables and or meats and some seasoning in the oven for a hearty meal. The cooked grains can be kept in the fridge for a week, so cook up a pot and see what uses you might find for them during the week. Many mixed grains recipes have rice as part of the blend. You can try adding 1 part uncooked brown rice to 3 or 4 parts mixed cracked grains and cooking them together.
Basic Recipe
1 cup Mixed Cracked Grains
3 cups water
1/2 tsp salt
Boil water, add grains and salt. Cover and simmer until tender, about 35 minutes. Drain if necessary.
Ground Beef and Savoy Cabbage Lo Mein
12oz ground beef
1 onion
2 cloves garlic
1 tsp minced ginger
1/2 head savoy cabbage
1 medium carrot
1 sweet pepper
4 oz spaghetti - about 1 1/4" (3cm) diameter
2 tsp olive oil
1 cup beef stock
1 tbs tamari
2 tbs sherry
1 tbs cornstarch
Cook pasta according to package instructions.
While pasta cooks: Thinly slice onion. Mince garlic. Mince ginger (peel first). Cut carrot into matchsticks. Slice pepper into thin strips. Remove dark green outer leaves from cabbage. Cut off a thick slice, avoiding the core. Lay flat, cut into 3 or 4 wedges, then thinly slice the wedges
Heat olive oil in large nonstick skillet over medium-high heat. Add onion and carrot to skillet; stir-fry for 2 minutes. Add garlic, ginger, peppers, cabbage and stir-fry another 3 minutes. Remove vegetables from skillet and set aside. Add beef, and fry, breaking it up as it browns. Return vegetables to pan. Add beef stock and bring to a boil. Cover, reduce heat and simmer for 5 minutes. In a small bowl, whisk together sherry, tamari and cornstarch. Uncover skillet and stir in cornstarch mixture until thickened.
When pasta is done, drain and add to skillet. Toss to combine, tongs work best, or two forks. Serve. (If spaghetti doesn't fit into pan, put it into a large bowl and pour beef and vegetables on top.) Add more tamari if desired, according to taste.
BBQ Country Style Ribs
This recipe was reviewed by over 200 users of allrecipes.com, most giving it 5 stars. Not surprising as the method is perfect for this cut of meat and the lemon slices on top help tenderize the meat while it cooks. You could use any BBQ sauce for this, or just serve the ribs plain if you have picky kids in the house. They'll be yummy regardless. Some reviewers covered the ribs with foil for the first 2 hours to keep the more moist.
10 country style pork ribs
2 teaspoons minced garlic
1 lemon, thinly sliced
1 (18 ounce) bottle barbeque sauce
Preheat oven to 250 degrees F (120 degrees C).
In a shallow baking pan or roaster, place ribs in a single layer; salt if desired. Spread the garlic on the ribs, then place the lemon slices on top. Bake in a preheated oven for 2 hours - the ribs should be tender. Drain any grease and liquid. Pour BBQ sauce over the ribs. Return to oven and bake one more hour at 200 to 250 degrees F.
Oven Roasted, Delicious and Tender Tangletown Duck:
This is Lila and Dave's method for roasting their ducks in the oven. Though duck meat is quite lean, there is a layer of fat under the skin of ducks so drippings will be copious. Be watchful in case the fat should catch fire (less of a concern in the oven than on the grill).
1 Whole Duck
For stuffing (none of this is set in stone - use what you have)
3/4 cup celery - chopped
1.5 cups onions, chopped
1/2 apple, chopped
2-3 cloves garlic, minced
fresh herbs (thyme,oregano and sage are favorites)
Seeded Baguette, pre toasted and cut into small cubes
Preheat Oven to 350.
Mince at least 2 cloves garlic and rub over entire duck.
Place ON A RACK in a roasting pan. (this is important so as to let the fat from
the skin drip out).
Remove heart, neck and liver from cavity. Add stuffing to the cavity.
Gently make a few smalles holes in the breast and back of your duck. This is to
allow the fat to be released more evenly.
Put the duck in the oven, breast sided down. reduce the temperature to 275.
Cook slowly for 2 and a half hours or so.
Pull the duck out and flip over. Increase the heat to 300 and cook for another
30-45 minutes until the duck is fully browned. it will be more time for a duck
over five pounds, less for a duck under four pounds.
Drain the fat out of the pan. Save for later use in other recipes. Or, add garlic and herbs and make the fat into a rich gravy. Be careful not to over-cook your duck. Duck meat by nature is very lean, even though the skin has quite a bit of fat. The meat is flavorful and tender when cooked carefully and thoroughly.
Grilled Duck
So, there are two ways to grill duck: with a small grill fire or a large one. Meaning not what temperature you heat your grill to when you begin, meaning that you can either cause a small grill fire or a large one while cooking. Cooking a duck on the grill equals fire. No matter how you choose to grill your duck, keep you eyes on the duck at all times. All methods below have been tested thoroughly by Lila and Dave.
For a smaller fire:
Cut your duck in half. Cooking halves is much easier, and only takes a minute to cut the duck in half with a very sharp knife. Rub your favorite seasonings on the duck. We usually use salt and pepper only, as the duck flavor stands alone. We have marinated in barbecue sauce, or garlic herbs and a dash of olive oil as well. For a small grill fire, gently poke some holes into the breast and back of your duck (about 1" apart and piercing through both skin and fat until the knife tip meets the resistance of the duck meat below). Pan sear for a few minutes to just cook out some of the fat. Keep the duck moving a bit in the pan so as not to begin to cook the meat very much. Because duck meat is very lean it is important to cook the meat slowly to keep it from toughening.
Turn your grill on Medium.
Wrap your duck halves in foil, and place on the grill with the open carcass side down. Cook for 7-10 minutes, with the cover on the grill. Wait until you hear dripping and sizzling a bit going on. Then flip the duck and cook for about five minutes.
Now, remove the foil, and let the duck brown.
If the fire is getting big, take the duck off, let the fire burn out, and start again.
Duck is done when the skin is thin and crispy, and the duck is brown all over. If skin is not thin and crispy, the fat underneath has not been cooked off.
You can use the method above to grill a whole duck. Just wrap in foil and grill for 40 minutes or so. Then cook uncovered to brown.
If you want to grill the duck without foil, cut the duck into smaller pieces, and grill like small pieces of chicken. If you remove the skin from the duck breast, cook carefully so as not to overcook and toughen the meat. It is REALLY good this way. Like the steak of poultry.
For a large fire, cut the duck in halves or parts and put it on the grill. Turn the pieces continuously for about 12-15 minutes, avoiding the large flames ensuing from your grill. Cook until the fire is just subsiding. We have cooked half a duck at a time to keep the fat at bay. Usually after the fire completely chars the outside of the duck it is done and tender, and you eat it immediately. If you wait to eat for more than 30 minutes, the meat will cool and toughen.


Comments